Tuesday 4 October 2011

Amazing Grace


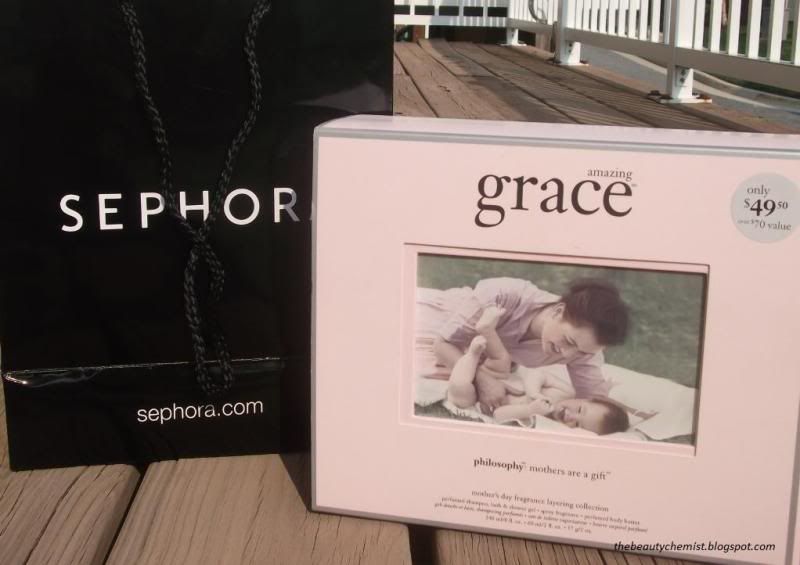
I bought this in the US from Sephora just before I headed back home to London (I know it was plenty of years ago, but I'm still rather heartbroken Sephora closed in London). I've always loved the Amazing Grace scent and have a tiny 'sample' bottle of it from one of the Sephora sampler Christmas packs.


They say the scent is soft feminine and floral (floral blossoms with a hint of light musk). To me the scent is soapy and clean - very feminine, but not specifically floral. Either way it's a delightful daytime scent.


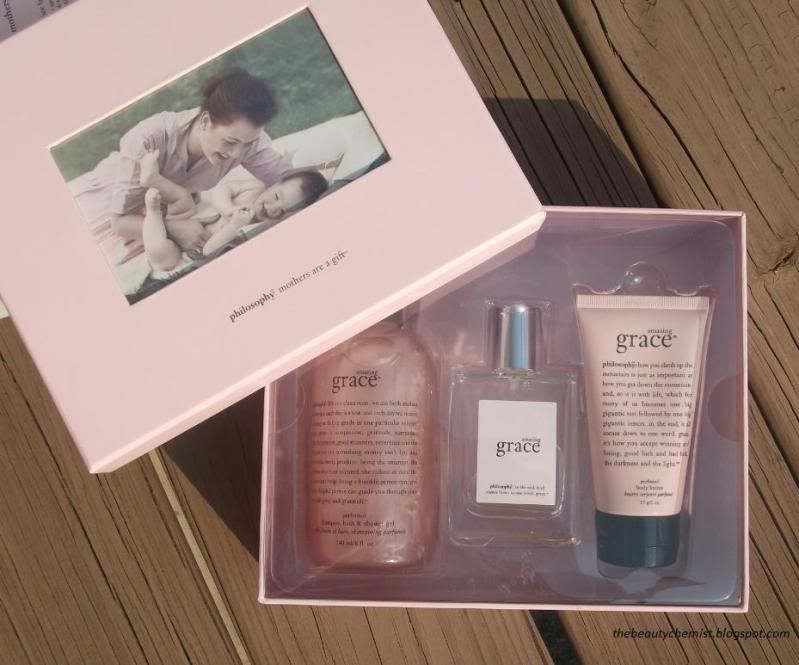
I got the set, so it came with the body butter and shower gel, both of which I have yet to use. Philosophy bath products have not failed me yet though, so I doubt it will start with these.


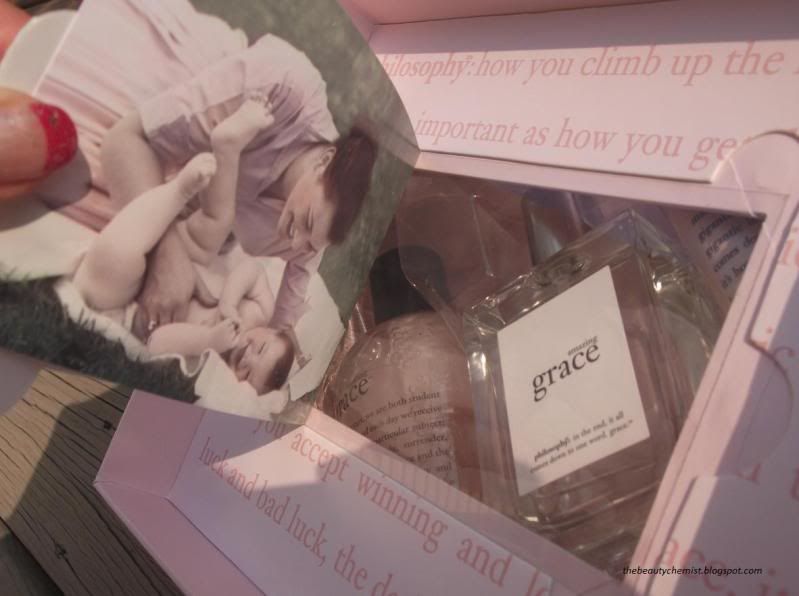
Something I love about Philosophy is their packaging. They really hit the nail on the head. This specific set is made with Mother's Day in mind, and the packaging allows you the option of removing the generic photo and instead putting your own personalized picture inside. It's such a small detail - but they're the ones that always make the difference!

Sunday 2 October 2011

A little Obsessed?


So for as long as I can remember...or well, at least the past few months, I have been lusting after a Michael Kors Rose Gold watch. My dear parents finally took the hint and as a 'gift' for the start of university I adopted into my family my new baby - my Michael Kors watch.


Sometimes I touch it just to check it's reality...honestly though. My sister caught me a few times and started laughing.

Whirlwinds


The past few weeks has been a whirlwind and a half.
Since my last post, I flew half way round the world back from Singapore to the East Coast of America, and the home to London before going on a quick week long holiday to Tenerife with friends.
The whole thing was rather comical. I had a couple of energetic 'last minute' shopping days in America before packing up my whole life neatly into two suitcases, (one of which ironically burst open as it came through baggage claim) and flying home to London. I then went on the epitome of a classy British holiday in Tenerife, which then required two days to recover from my ailments of a week with almost sleep.
Next came Freshers. If anyone knows Universities Freshers in the UK, the KNOW nothing takes a higher priority than sleeping....and drinking...but mostly sleeping.
Now here we are.

So my goal is to get back into the swing of things. I'm sorry that I left you so long. My mind has been thinking up new ideas faster than my body can react to them.

Friday 26 August 2011

Food for Cuticles


After I slew of bad manicures I decided to take matters into my own hands, and am buying all the tools to do my own manicures. I recently stopped by Skinfood and as of my favourite asian brand I
decided to try my luck and pick up their 'Coffee Almond Nail Scrub'.


I love that this scrub doesnt only help take away dead skin, but hydrates and moisturises the cuticle area too. Not to mention it smells delicious! Coffee and Almonds? Yum!


I'm obsessed. I just know that when I'm back in university I'll be using this scrub as a form of procrastination.

Thursday 25 August 2011

'The Disposable' Bracelet

Being the creature of habit that I am I made another trip to the $2 store for some DIY supplies. I say 'another trip', like it was only one trip...but we can talk more on that later. Since my lace bracelet turned out better than expected I thought I'd try my luck again and went straight for some ribbon. It turns out much like lace, ribbon frays. Only it's a little weaker, and when it frays it FRAYS. Although, dipping the end in some wax or pvc glue certainly helps matters.

So instead of creating a bracelet to last - which is what I've tried to do in the past - I'm branding this one 'The Disposable'. For $2 SGD/ £1 I received 6m of ribbon, and each bracelet is around 35cm in length. That means for $2 I can make 17 disposable bracelets!

DIY RIBBON BRACELET

Materials: Ribbon


Step 1 
Cut a piece of ribbon to size. The piece I used was about 33cm in length - evidently it depends on your wrist size and how tight you want the bracelet. My wrist is 14.5cm around.


Step 2 
Tie a knot leaving a 2-3 inches at the end. I thought I'd include pictures on tying a knot....just in case - always be prepared!


Step 3
I personally tied 6 knots with spaces of around an inch in between. Obviously here you can use your own discretion on how close you want the knots to be.
nb.Of course, if the physical action of tying 6 knots in your ribbon proves too much for you, you can just wear it as is. 


I paired two of the knotted ribbon bracelet with one plain ribbon bracelet.
These are lots of fun since they come is any colour under the sun with varying textures and patterns and they're incredibly easy and inexpensive to make. Then best of all, they are even suitable for people that share my skill level in arts and crafts - a low, low, LOW skill level. Enjoy! 

Wednesday 24 August 2011

Dreaming of Péridot

peridot gem


The beautiful colour and semi-holographic nature of the Chanel Péridot vernis actually reminds me of Missha 'hgr01'. Which is why I had to think if I wanted to buy it or not - since Missha is so inexpensive in comparison to Chanel. However, I decided that as inexpensive as hgr01 is, it's still a completely different shade to péridot, and so money exchanged hands and I got to take péridot home with me.  


I actually had to rush out the house before I had a chance to paint my nails, so I found myself painting my nails in a bank, no less. I felt somewhat bad about half gassing everyone with the stench of polish, but I decided they would appreciate the colour once I'd finished.   So yes, the skill of application leaves something to be desired, but the colour speaks for itself.


peridot gem via

Occupation of a Queen

"Lace - the invention of a goddess and the occupation of a Queen."


I've been having a love affair with lace of late, and when I stopped by the $2 shop the other day I saw some beautiful lace strips in the DIY section. So naturally, my first thought was 'I NEED to buy this', then once my reasoning caught up with my desire, I realised I needed to do something with it. So, I present to you my,
DIY: Lace Bracelet.

Materials: Elastic, Lace, Thread, A Button


Step 1
Lay the lace and the elastic together, and tie a knot onto the end of the thread you are using. Make sure you leave a 2-3 inch length of bare elastic at the beginning. Then, from the underside of the bracelet start by threading the needle through the elastic first, and then through the lace.
nb. one small knot in the thread will suffice as it would take a large force to pull this through the elastic.

Step 2
Go back on yourself and thread through the lace and then through the elastic.

Step 3
Continue to weave over and under to secure the lace and elastic together.
nb. I used lace that had concentrated bits of lace where my thread-work would be hidden.

Step 4
Once you reach the length you want make sure the thread is secure and will not unravel by making another tight knot as close to the elastic as possible. You can cut the lace where it ends, and leave an extra 1 centimetre to sew the button to.

Step 5
Sew on the button to the 1 centimetre of bare elastic.

Step 6
On the other side where there is 2 inches of bare elastic, fold it in such a way that when the button it attached, it will still lay straight (as done in the above photo)

nb. To stop the lace from fraying once cut, you can dip the ends in a little bit of PVC glue, so that they'll stay together and your bracelet will last for a longer time.


You can make the bracelet go once around, or make it into a wrap bracelet! I personally prefer the single one as once there are too many wraps it starts to look a little like a bandage.